Basement Finishing, Pre-Planning Checklist, Part I

Are you thinking about tackling a basement finishing project yourself as an owner-builder? On a previous post, we talked about different ways to add space to your home. In this post titled What Does it Cost to Add Living Space, we talked about how basement finishing was one of the least expensive avenues to add square footage. If you have decided to take on a basement finishing project as an owner-builder, there are several things you want to review prior to beginning to make sure you end up with a quality job. Check out our new video describing the pre-planning required for your finished basement, Part I.
-
Check carefully for moisture on floor and walls. We don't want to cover up any problems! Starting a basement finishing project before eliminating moisture problems is a recipe for disaster!
-
Foundation Walls: Check for cracks. Any leaks? Displacement? Repair these now as they will be much more difficult to get to later. There are DIY kits available that are relatively easy to use...takes about three hours and $75 or so and you will have a solid repair. If you're not the DIY type, the typical professional repair with a warranty will cost you somewhere in the $250-$300 range. If you have displacement (a crack that is moving) you should consult a professional engineer to review (preferably one that doesn't do repairs as this is a conflict of interest). We want to repair any structural problems before our basement finishing project begins.
-
Locate Dampers on ductwork (levers that adjust air flow): Preferably, you will provide access to these in the future after basement finishing. If you don't want to provide access, you can adjust them to a setting that will work best for year round use. I adjust my dampers when the seasons change (heating vs. cooling) for better efficiency. So I personally would leave access to the dampers in my basement finishing design.
-
Locate Shutoffs and Cleanouts: You will want to provide for future access to your main water line, main sewer line cleanout, and any other water shutoffs or cleanouts in your basement. If you have a clog in your sewer five years down the road, you don't want to be cutting holes all over your basement while standing in raw sewage. So, including access panels for mechanicals should be an essential part of your basement finishing design.
-
Material Access: If your stairs going down into your basement turn, you may want to use a basement window to get materials down there. In my experience, stairs are much tougher to use for material access as you end up damaging your new drywall material and you damage your existing walls. If you have a 4 foot wide escape window, you can build a ramp out of 2x4's going down throug the window and just slide the material down...much easier on the material and your back/legs. You may want to keep your drywall to 4x8 sheets and 2x4 plate material to a maximum of 10 feet lengths. Basement finishing requires a lot of material...be sure to have a plan for getting the material down to your project.
-
Electrical Panel: Check to make sure you have unused slots for new breakers. If not, you will have to go to the additional expense of a sub panel or maybe even bring a new service line to the house. Most of the basement finishing projects I have completed used no more slots than were already available in the existing electrical panel.
Yesterday we posted Part I of a series of videos to help make basement finishing an easy project for an owner-builder. Today, we posted a new video titled Pre-Planning for Your Finished Basement, Part II. In this video we review all of the things to consider before you start your basement project. We want this project to last a long time so there are some things we need to locate and review prior to starting the design of our basement finishing plan. Here is a quick checklist of some of the items we cover...
-
Seal basement floor to wall joint & any other cracks in the floor. This provides an additional moisture barrier and also helps seal the floor from radon gas.
-
Locate mechanical and structural obstructions so we can incorporate them into our plan
-
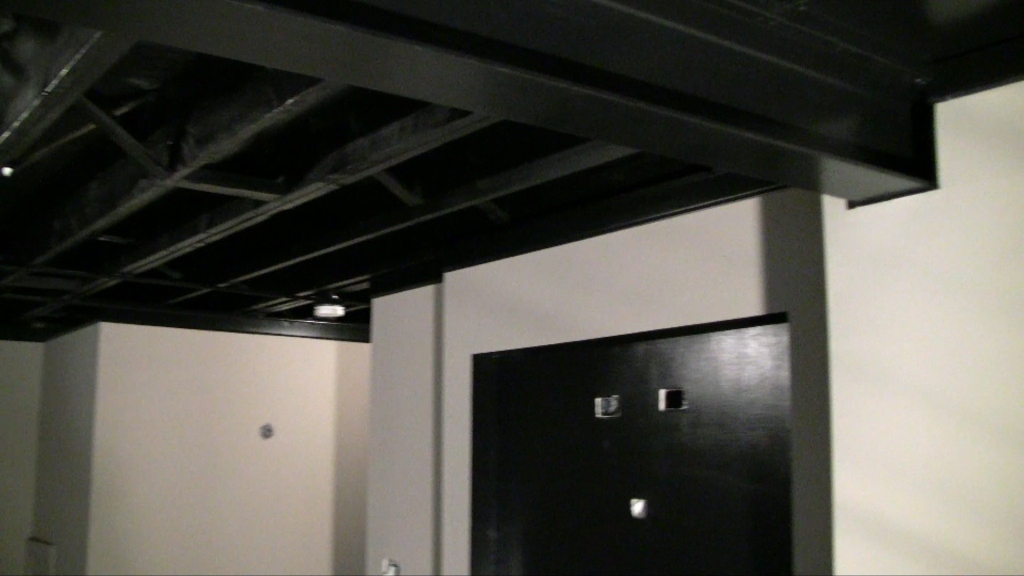
Ceiling: Decide on a finish based on the types of plumbing, HVAC and electrical access that will be needed in the furture. We will also want to consider head clearance when deciding on a ceiling for your basement finishing project. Popular options for basement ceiling finish include drywall, dropped, or a combination of both. We decided to go with an urban loft look to our design. So, we basically will paint the ceiling black and leave the mechanicals exposed. This gives us maximum head clearance and will provide easy access to plumbing, HVAC, and electrical in the future. This exposed ceiling goes with the soft contemporary design we have chosen for our new basement finishing project.
Creating Your Plan for Basement Finishing
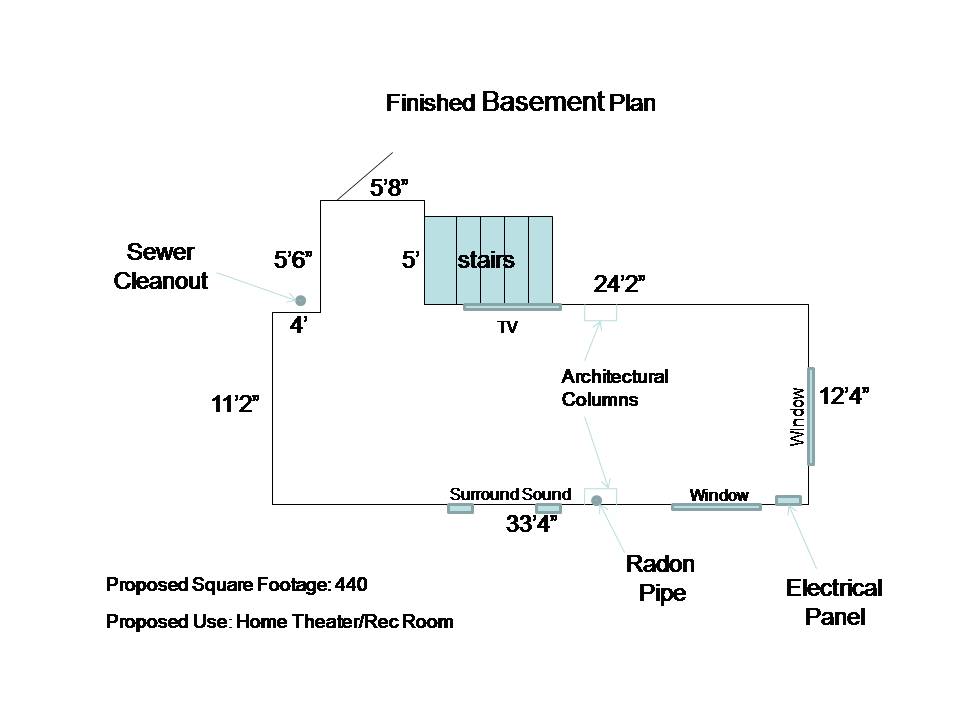
Hopefully you were able to watch our last video in our basement finishing series titled Pre-Planning for Your Finished Basement. Now you are ready to move on to creating the plan for your new space. The plan is necessary to allow the subcontractors and suppliers to properly estimate material and labor quantities. So, this plan will be an integral part of our bid package for your basement finishing project. We will also use the plan to submit for our permit. You will probably want to check with your local building department to see what information they would like to see on the plan before creating it. For our basement finishing plan we have included the following information...
-
Wall dimensions (including length and height)
-
Location & Size of New Doors
-
Locations of mechanical clean-outs, shutoffs, dampers
-
Architectural elements, including columns, arches, nooks...
-
Electrical Plan (including lighting, cable outlets, switches and any special electrical outlets). We also include special notes for the type of wire required (conduit enclosed or insulated wire...i.e. Romex)
-
HVAC Plan showing locations and sizes of supply ducts and return air ducts and any additional equipment needed.
-
Plumbing Plan showing locations and sizes of sinks, showers and toilets. We aren't adding any new plumbing in our project so we didn't have a plumbing plan.
Basically, we want to show as much information as we can fit on your basement finishing plan. Later we will create the scopes of work and specifications for each activity, which will designate the types of materials to be used. However, you may want to include this info on the plan as well. Ideally, your plan will be to scale. This is easily achieved by getting graph paper from your local office supply store and choosing a scale that works for you (i.e. each block equals a foot). For more information on creating your finished basement plan check out our new video, The Basement Finishing Plan.
Keep Moisture Out: Basement Finishing
If we are going to put time, effort and money into basement finishing, we need to make sure we take steps to keep the moisture out. There is nothing worse than having to remove new carpet, drywall, and insulation because water made its way into your home. Here is a checklist I use whenever one of my customers is thinking of starting a basement finishing project. Don't forget to speak to your homeowner's insurance agent to add coverage for your newly finished project. Most policy's require a rider to cover basement water damage or damage from a sewer backup. I have provided two different checklists, one for incorporating a project into a newly built home from the ground up and then one for a basement finishing project that is being added to an existing home.
If we are completing the basement finishing project as we build a new home from the ground up...
-
Include plastic/visqueen under the basement floor to help keep moisture out. The sheets of plastic should be taped together with no gaps or holes. This will also be a part of your radon mitigation system.
-
Install interior and exterior draintile connected with bleeders through the footer every 8'. This comes in handy if there is ever a problem with either the interior or exterior system. We are basically adding redundancy for your new basement finishing.
-
For a large basement, run a diagonal draintile under the floor connected to the sump crock. This helps when you have a high water table.
-
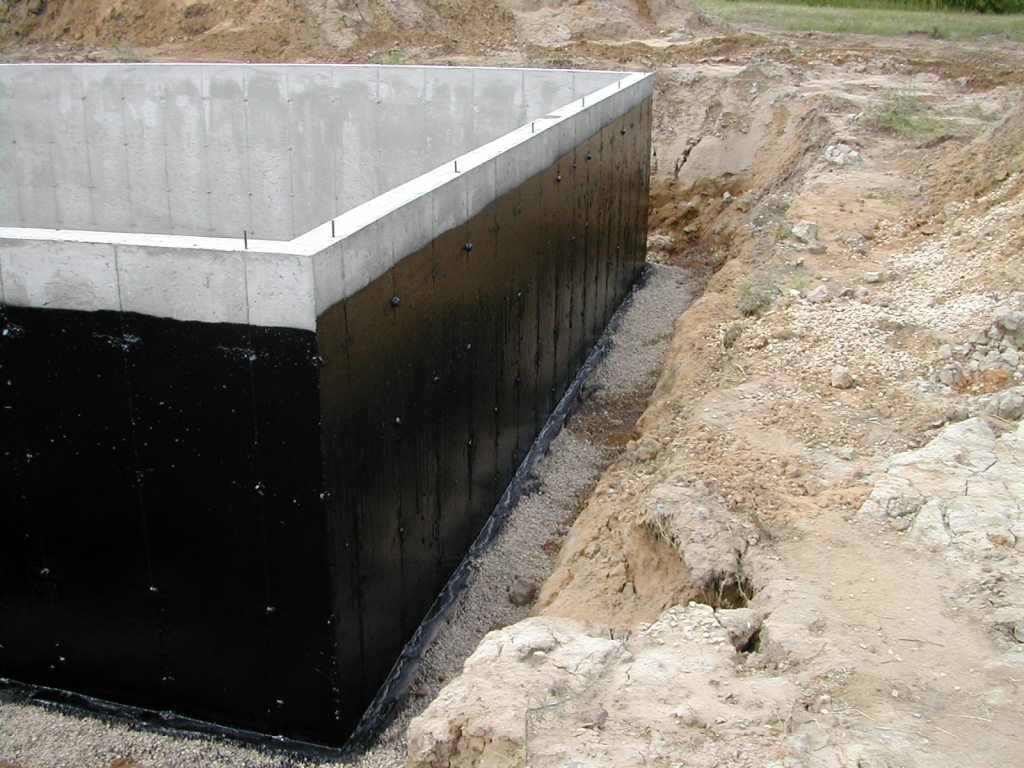
Apply waterproofing to the exterior foundation wall. This should be a pliable material that will span any cracks that occur in the foundation wall.
-
Install an insulation/drain board on the exterior foundation wall. This material actually serves two functions; It prevents groundwater from being trapped up against the wall, which will eventually make it's way through. It also provides an R-Value to a concrete wall that alone, has almost no insulation value.
-
Properly slope the grade around the basement. The grade should drop 6" for the first 10' around the home.
-
Install a high quality sump pump along with a battery backup system and/or alarm. A battery backup system will cost $350-$500 installed. This is a small price to pay to protect your new basement finishing project.
-
Silicone the joints in the concrete floor including the perimeter at the wall. This is also an integral part of your radon mitigation system.
If you are incorporating a basement finishing project into your existing home...
-
Silicone all joints in the concrete floor including the perimeter.
-
Check the finished grade around the basement. There should be a minimum 6" of fall for the first 10' around the home.
-
Make sure all downspouts are connected and discharge rainwater away from the home
-
Check operation of sump pump and check valve. If the pump is older than four years, replace it.
-
Add battery backup sump pump and/or water alarm
It's also a good idea to run a dehumidifier in your basement during the summer months to remove the moisture from the air. This will help keep your new space cozy and dry. Taking steps to Keep moisture out is an integral part of any basement finishing project.
We have been talking about how to properly plan your basement finishing project as an owner-builder. In this section, we will discuss how you go about getting bids from subcontractors. You will send out bid packages to a minimum of three subcontractors per activity. So, you will send out a package to three different drywall companies, three different trim carpenters, three different painters...etc. We ask for three bids to make sure we are getting a fair price for your basement finishing project.
The bid package consists of three items: the plan (or architectural renderings), bid sheet (template for how we want the pricing broken down), and the scopes of work and specifications (define the work to be done and detail quality requirements). These three items can typically be emailed or you can make paper copies for the subs to pickup. Some of the subcontractors will insist on a scaled paper copy of the plan in order to scale off the dimensions to estimate quantities for your basement finishing.
I usually give the subcontractors one to two weeks to get back to me with the bid. This should give them plenty of time to work on them. Keep in mind, many of these guys work out on the job site during the day and the only time they have to estimate and bid is at night or on weekends. So, we want to be respectful of their family time.
We have also posted a new video on how to use the bid sheet to save time and money when bidding out your basement finishing project.
We've been talking about how to tackle a basement finishing job as an owner-builder. In our last post we discussed the importance of the bid package and how the bid sheet gives your subcontractors a specific format for submitting a bid. This format allows you to easily review each cost item for the activity and make quick, good decisions based on the information. Here we will discuss the Scopes of Work and Specifications and how they help you get accurate bids. We have also posted a new video discussing the importance of the Scopes of Work and Specifications in your new finished basement project so check it out!
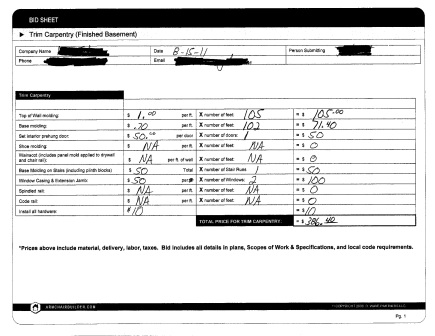
Post continues below the graphic...

- Scopes of Work, Trim Carpentry
We've given you a full size copy of the scope of work and specifications for the trim carpentry activity in our basement finishing project. There are two main objectives for the scopes of work and specifications. First, we define the work that is to be done. In other words, we tell the subcontractor what we want them to do. This allows them to properly estimate and bid the project. In our trim carpentry example here we tell the trade what items they are required to provide like nails, glue, labor...etc. We also tell them what items they will be installing from casing to extension jambs. The more accurate we are in our description of what we expect, the more accurate the bid will be. You really don't want to come back later and say to your subcontractor..."oh, and by the way, I forgot to mention..." If you do, you will get additional late costs and fees from the sub that will wreak havoc with your basement finishing budget.
The second major objective of the scopes of work and specifications is to outline the quality you expect. In our example, we tell the trim carpenter where we want the door shimmed and how high off of the floor to set the door. We also let them know we expect them to protect all other work and to clean up at the end of the activity. Basically, we highlight the most important quality initiatives. I have created these documents from years of building and remodeling homes. At the end of each project, I would re-evaluate the scopes to make sure they had everything we needed to avoid problems. The scopes of work and specifications will help your basement finishing ideas match the actual finished product.
Below is the second page of the scope of work and specifications for trim carpentry for our basement finishing project. Number seventeen is probably the most important item. We need to make sure all subcontractors tell us if they experience any unexpected items that will cost us extra money before the work is done. We cannot, and will not accept an invoice after the work is done that adds on additional items if we haven't previously acknowledged and agreed to the extra cost in writing. This way, we can evaluate the extra charge before the work is done to check for validity and to see if we want to take another course of action.
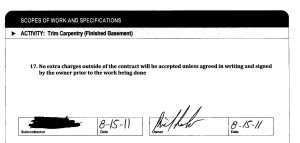
The last important item is the signature and date of your subcontractor. By signing, the trade acknowledge they agree to the terms and will perform in this way. I can't tell you how many times I have had to pull out a scope of work and specification to remind a subcontractor during a job what type of quality is required. There really is no argument if it's in writing and they signed it. These steps will not only help you build a quality finished product, they will also keep you basement finishing project on budget.
The Schedule for Basement Finishing
If you're planning on tackling a basement finishing job as an owner-builder, and you want to finish it quickly, it's a good idea to have a written schedule. This schedule lists each activity in the order they are to be completed and shows the time allowed for each. In this post we will discuss why you need a schedule, the critical components and time frames, and how you fit in when providing your own labor. For more information on scheduling your basement finishing buildout, check out our video here.
Why Have a Schedule? As mentioned before, the schedule tells your trades when they are to start and finish their work. It shows them your complete schedule so they understand the importance of hitting their scheduled date. The schedule also keeps you, the general contractor, organized when it comes to material ordering, inspections and quality checks. Without the schedule, you might miss something critical that can set you back days or worse yet, require tear out because you missed an inspection. Using a written schedule in your basement finishing buildout will help you stay organized and will allow you to start enjoying your new space sooner.
Critical Components. The first, and most important activity to any building schedule is pull permit. We don't want to forget this item as it can cause major delays if forgotten. Check out our previous post on permits for more info on this. Inspections are another critical component to your schedule. You need to make sure the local building department approves of your work prior to covering it up. If you forget this step, you may be required to remove work that you have already completed. Or you may be require to pay additional penalties for not pulling a permit for your basement finishing project.
How Long? The first question I typically get from customers regarding their building projects is..."How long will it take?" Most basement finishing jobs take anywhere from four to six weeks to complete depending on size, finishes, and complexity. I have accelerated schedules before to finish off a basement in two weeks. However, this required a very tight schedule that used hours, not days. A shortened schedule will also require multiple activities to be going on at any given time. This is typically not the most efficient way to go. And don't forget, efficiency equates to cost savings. To get the best pricing from your subcontrators, give them the time they need to get the work done efficiently during normal working hours.
But I want to do Some Work Myself. No problem, this is one of the benefits of being an owner-builder managing your own basement finishing project...you get to decide who does what. Just remember to figure into your schedule your day job and family life. I have always said, "the best schedule is a realistic schedule." It does you no good to create a one week schedule if it takes three to do the work. Just be realistic and your trades will thank you for it. If you miss a target date, don't forget to call all of the subcontractors that are scheduled afterwords to allow them to change their schedule. Don't forget, your job is one of many jobs they have on their schedule. If you plan on doing some of the basement finishing work yourself, be prepared to add extra days to your schedule.

Frame Quality Issues, Basement Finishing
The most important element in creating a quality finished basement is the framing. All of the finishes you see when the project is complete are affected by the rough carpentry quality. So what kinds of things can go wrong if the rough carpentry in your basement finishing build out is done in an inferior fashion?
Ugly Tile Cuts: If the walls are not carefully set they can end up being out of square with the others. This will cause problems when you install hard surface flooring and ceiling tiles. The tiles create a grid pattern on the floor and ceiling. If your walls are not square, you will end up with partial tiles that are different sizes along the wall that is out of square. This screams poor quality.
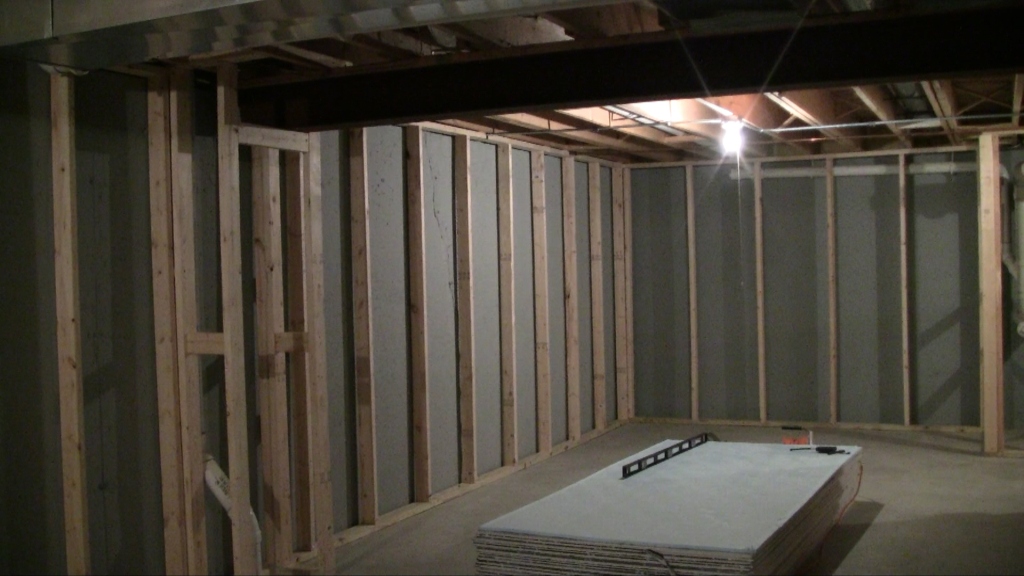
Lumpy Walls: Studs can deform because of the moisture content in them. As they dry out, they can twist and bow so they are no longer straight. If these deformed studs are installed, they will cause your walls to be deformed as well. Don't forget... the drywall follows the framing. These deformations will show up most pronounced in your moldings (Example = chair rail). They can also affect the installation of your doors. If the bowed stud ends up at your rough opening for a door, the door won't sit plumb and may not operate properly.
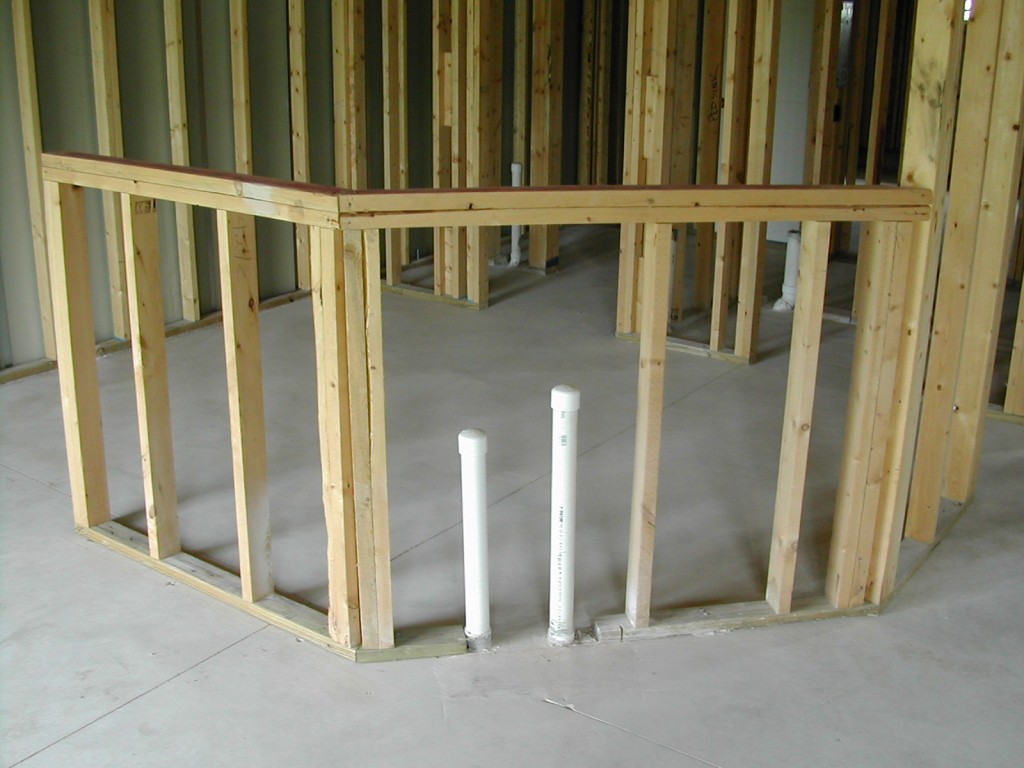
Premature Deterioration: You are spending a great deal of money on your basement finishing project so it would be a shame for it to fall apart within a few years. This can happen if we have untreated wood touching concrete. The concrete wicks up moisture from the ground and can cause deterioration in any untreated wood that touches it. Make sure your walls are built so there is an air gap between the foundation wall and the studs. Also, make sure your carpenter uses treated wood for the base plate (the bottom of the wall that touches the concrete floor).
Holes In the Wall: It's important to make sure the carpenter frames out access panels for all shutoffs, dampers, clean-outs in your basement finishing build out. If these are forgotten and the drywall is hung, you will be automatically enrolled in a game I call concentration for clean-outs. You know the game with the cards...you keep turning over the cards to find a match. In this case, you will be cutting holes in your new walls to find the clean-out (or damper or water shutoff). "Is that it...oops, no. How about here? Oops, not there." This can be very costly and will lead to major frustration. There is nothing worse than having to cut holes in a brand new wall and then having to live with patches that will never be quite the same. Add on top of that a sewer backup...and then a game of concentration for clean-outs on top of the mess you already have! No thanks!
Crooked Columns: Have you ever seen an architectural detail that was crooked or not straight? Maybe it's just me because I'm a builder but these things will drive you crazy. They make you ask the question...if they couldn't get the column straight what else did they screw up that I can't see? Even if the lolly columns in your basement aren't perfectly straight, you can compensate for them with the newly framed columns in your basement finishing project.
Window Doesn't Open: Most newer basements that aren't a walkout or garden level will have what they call an escape window with well. The function of this window is to provide an alternate escape route in case of fire. Many of these escape windows come out by pulling them into the basement. If your framing is installed too close to the window, the drywall or trim may prevent it from coming out. So, make sure you check the framed rough opening to make sure the window will operate when all of the finishes are in place.
By performing a proper frame quality check, you will avoid many of these problems in your basement finishing project.
With the state of the economy today, people are looking for ways to save money. Many people have moved in with relatives until they can get back on their feet. So what is the least expensive and quickest way to add finished space to your home? Basement finishing is the quickest, most cost efficient way to add living space to your home. Here we will give you five tips for saving even more money on that new space.
Increase Wall Stud Spacing to 24": The new framed basement walls you are adding are non-load bearing or non-structural. This means they support drywall, wiring, trim...etc. but no loads from above. This allows you to increase the spacing of the studs to 24" instead of the typical 16". At $2-3 per stud, the savings can add up.
Open Ceiling: Instead of drywall or a suspended ceiling with tiles in your basement finishing build out, you can leave your ceiling open and paint it black as they do in modern lofts. We used this design in our latest basement finishing project and it came out great. The biggest benefit of this type of finish is the cost savings. A suspended ceiling can cost $2000-$3000 depending on the type of tile you use and the size of your space. The other issue you run into with suspended ceilings is...what do you do at the beams and low HVAC trunk lines? If you lower the suspended ceiling to the lowest point, your head room can diminish to a ridiculously low point. And if you drywall, you end up with soffits around those areas...which typically makes the ceiling look choppy and takes away the character. The other great benefit to the painted open ceiling is the extremely easy access you have to mechanicals in the future. If you need to add a cable or phone outlet later, the open ceiling makes the job simple.
Minimize Doors: In our last basement finishing design we eliminated a duplicate door to the storage area. We saved $350 on the door, door knob, jamb, casing, and labor to set, trim, prep and paint. The other great thing...by eliminating a door, we created more wall space for art and furniture.
Place Sinks by Existing Floor Drain: It can add hundreds of dollars to a basement finishing project to cut, remove and replace concrete when under slab plumbing needs to be added. You can minimize this by locating your sinks by an existing floor drain.
Stain Your Concrete Floor: Staining your concrete floor is a great way to provide a high quality finished look without adding a ton of cost. Along with cost savings, you get a floor that is resistant to moisture and is extremely durable.
We've been walking you through our basement finishing project. In this section we will discuss our quality checklist for the mechanical rough-ins. Since we are adding a theater/rec room for our finished space, we don't have any plumbing to inspect. If you have these in your new basement design, now would be the time to review those as well.
Rough Electrical: Check all wiring is in conduit if required by code. This helps protect the wires when you are hanging pictures or remodeling. Check all switch, outlet and light box locations. Be sure to verify not only the locations and quantity, but also the height and orientations. This is particularly important for the outlet and cable at your TV location. We want to avoid having wires dangling around these. Verify that the new circuits your electrician added are labeled. Finally, make sure your cable is tied into the splitter at the main cable entrance to the home. Also review any low voltage or speaker wires that have been run to make sure they are in the proper location. It's always possible to add wiring after drywall in your basement finishing project...but it makes a big mess and adds time and/or additional cost.
Rough HVAC: Check all heat runs and supplies are installed per your basement finishing plan. Verify the sizes are correct. We also want to check to make sure all joints in the ductwork are sealed with either a mastic or a butyl tape. Make sure they didn't use duct tape...it is notorious for falling off over time. The ironic thing about most duct tape...it's good for everything but ducts! If you haven't already, you will want to have your HVAC contractor review the sizing of your equipment (furnace and air conditioner) to make sure they can adequately heat and cool the new space. Most home systems are over-engineered so adding some basement space will typically be ok...especially after sealing up leaky ducts and adding basement insulation.
Rough Plumbing: One quick note on your plumbing quality check for your basement finishing build out. It's a good idea to run a pressure test on your new system to make sure everything is tight at this stage. With a pressure test, the plumber puts a certain amount of pressure in the supply lines and then places a gauge at one of the openings to make sure it stays consistent over a period of time. The supplies are tested with air and the drains typically with water. Once the drywall goes up, repairs will be tough to make...and I hate to see a brand new wall cut open to make a repair that could have been avoided! Not to mention the possible damage that can occur to your new basement finishing material from a slow leak.
This rough mechanical quality check is essential to completing a quality basement finishing project. Once the drywall goes up, it will be very difficult to get to these without major damage and re-work. Check out our new video on Rough Mechanical, Quality Check for your new basement finishing project.
By insulating your new basement finishing project will help you create a cozy space that will actually improve the energy efficiency of your home. Believe it or not, most new homes didn't get basement insulation until recently. This is crazy since up to 30% of your home's energy loss is through the basement walls. So in this section, we will discuss the different benefits of insulating your basement as well as the proper techniques for installation.
Benefits of Insulation: We just mentioned the biggest benefit of basement insulation; your space will be much more cozy and comfortable. By adding insulation to your space, you will help disguise the fact that you are actually underground. Basements are notorious for being cool and damp. Another huge benefit of insulating your new space is the energy savings you will see from it. It's crazy that most homes you go into today don't have any insulation in their unfinished basement. If you look at the R-values of concrete or concrete block (.64 and 1.11 respectively), you will see how much energy loss is through your basement walls. Don't forget, a good portion of you basement wall is above grade...anywhere from 10" to 2'. So you have an exposed wall that has almost no insulation value to it. Compare the meager R-values for the foundation wall mentioned above to your typical R-15 for your upstairs walls and you see the disconnect. You will save an additional $250-$350 per year in energy savings with an R-10 basement wall insulation.
Sound control is another great benefit you will see from the insulation in your new basement finishing build out. While shooting the quality check video for insulation, we couldn't believe the difference in the sound characteristics of our finished basement project. After insulating, the echo was gone and the outside world was forgotten. This was particularly important in our space since it was going to be used for a theater room. You can also eliminate the sound transmission from the upstairs if you insulate between the joist bays above your new finished space. This is a must if you intend to use your new finished basement as a rental unit.
Quality Check: Your fiberglass batt insulation should be installed so it fits neatly within the stud space with no gaps. Be sure the material is not compressed. Compressing the material can take away the R-value. This is because the key element to insulation is the air pockets between the fibers. Also make sure there are no overlaps, especially if you are using kraft faced batt insulation. You don't want to enclose the insulation between two vapor barriers as this will prevent moisture from getting out. As we all know, trapped moisture can lead to mold. I also like to maintain an air gap between the framed wall with insulation and the foundation wall. This space will help to dry out the space if moisture makes its way in. One other quality initiative when insulating with fiberglass batts...make sure your contractor cuts neatly around all electrical boxes. I would also recommend using an expandable foam behind the electrical boxes. This will prevent drafts through your outlets and switches.
Insulation Options for your basement finishing project: Fiberglass batts are currently the most common insulation used in finished basements. The ease of installation as well as the low cost make it the material of choice for most people. Another option would be to use a foam board up against the foundation wall and then frame your wall in front of this. This method is a little more expensive but does provide a layer of moisture protection. A more expensive option is to go with a sprayed expansive foam (open or closed cell). These can be three to six times the cost of fiberglass batts so I typically don't consider them on my projects. If your current unfinished basement already has roll insulation installed, you could frame your new wall in front of it. Just make sure you don't compress the existing insulation with the newly framed wall. This will diminish the R-value. One other option you may want to consider...an insulation board for the floor. Most basement floors are not insulated in any way. I would consider this if you decide to go with a hard surface floor. The energy savings you get by insulating your basement floor is minimal but you will probably notice a big difference in comfort level.
Check out our latest video, Insulation Quality Check, Basement Finishing for more details on how to check that your insulation contractor has done a quality job.
For our basement finishing project, we decided to use 4x8x1/2" sheets of drywall. This size fit nicely down through our window well without any damage. Our basement stairs turned so we used our 4x4 escape window for easy access. This helped prevent damage to our new drywall board and the existing walls and floors. The eight foot tall drywall board was perfect as our framed wall was right at 8'.

We chose to stand the drywall board up for our basement finishing project as this would eliminate butt joints in the wall. A butt joint is where two non-tapered edges of drywall come together. Typical drywall board has tapered edges on the long edges for easy finishing. Wherever you have butt joints, the finishers need to feather the mud (a.k.a. drywall compound) out farther in order to hide the joint. So the butt joints require an extra coat of mud. So by eliminating the butt joints, we save time in our schedule and money in our budget for our basement finishing build out.
We used a standard drywall board for our basement finishing project because we had a very dry space to deal with. If you have higher moisture levels, which most basements do, you may wan t to consider alternative drywall boards that are mold resistant. There are several types of mold resistant boards out there...some with and some without paper facings. I prefer those with the paper facing from a finishing standpoint as they are typically easier to get a smooth, consistent finish. Many of the paperless boards have a texture to them that stands out versus the smooth areas with the drywall mud coatings.
We have broken down our drywall quality checks below into the hang and finish activities. We did this because sometimes these two activities are completed by two different companies. You may decide to hang the board but you may not have the skill to finish it, so you hire that out to a subcontractor. If you are hiring subcontractors to do all the work for your basement finishing project, I recommend having one company do your hanging, finishing, and wall painting if possible. This helps eliminate the finger pointing if the walls don't come out as planned.
Drywall Hang Quality Check for Basement Finishing
-
Board cut tight to wall openings (i.e. electrical boxes, plumbing, cleanouts...etc.)
-
Cornerbead straight, level and secure
-
Board lifted off floor slightly (this is a good idea in a basement to keep the moist floor from touching the board)
-
Screws and glue used whenever possible (screws have better holding power than standard nails)
-
Cutouts for all cleanouts and access panels. Make sure these were uncovered. You willcreate collateral damage if you must to try and locate these in the future.
-
All electrical, phone, speaker, and cable boxes uncovered. Again, this is much easier to do now.
Drywall Finish Quality Check
-
Seams and angles are all properly sanded
-
Dust has been removed from the walls. When sanding, dust sticks to the paper on the drywall. If the dust isn't removed before painting, you will have a rough wall.
-
Floors scraped, swept and/or vacuumed. We don't want the airless paint sprayer to kick dust up onto the walls from the floor and stick to the paint.
-
Prime the walls and then perform a thorough drywall quality check. It is very difficult to see how good the drywall finish is prior to primer being applied. You don't want to put the final wall paint up until the drywall has been checked and areas fixed (a.k.a. spotted). This will give you a nice smooth, even paint finish without flashing (flashing is where you touch up a wall and then the touchup is visible even though you used the same paint)
That's all for our drywall quality check for your basement finishing project. If you follow these rules, you should come out with a quality, professional finish for your new space. Be sure to include all of these quality requirements in your scopes of work and specifications for your drywall subcontractor. You always want to get what you expect to happen in writing. Check out our resources section to get copies of our scopes of work and specifications for your basement finishing project.
Here is a review of the quality check for your basement finishing build out. Once your trim carpenter is finished, there are a few things you can check to make sure a quality job was performed. I like to perform this quality check at the end of the day prior to the trim carpenter leaving the job (whenever possible) so we can discuss any items that may not be perfect. If the items are minor, your trim carpenter will be able to take care of them right then rather than having to make a special trip back. A key part of any quality basement finishing project is a well executed trim installation.
-
Casing and Extension Jambs on Windows. Check for level/plumb and make sure the miter cuts are tight. Make sure the extension jambs don't affect the operation of the window.
-
Nailing. Check that your trim wasn't over nailed. I like to mention this to my trim carpenter before each job. Putting fifty nails into a piece of trim that only needs three or four is overkill and you painter will hate you for it. More is not always better in this case.
-
Base Molding. Check height off floor. For carpet, I like the base to be set 3/8" off the concrete. This allows the carpet installer to tuck the carpet up under the base for a clean, finished look. For tile, you will want to raise the base up to the thickness of the flooring and any underlayment you may use. You may also want to consider installing your base after any hard surface flooring for a cleaner, tighter finish.
-
Beveled Joints on Base Molding. Make sure you have no butt joints in your base. Whenever a wall is longer than the trim supplied you will need to piece the base together. For example, let's say you have a 17' long wall and your base came in 16' lengths. At the splice in the base, your trim carpenter should have bevel cut (45 degree cut) the molding. This will help cover the joint when the wood shrinks as it dries out.
-
Doors. Check operation. Make sure there are no areas that bind or rub. Check the door at the middle stop (the piece of trim in the center of the jamb). The door should contact this stop at all points. Check to see that the door was shimmed at the top, middle and bottom of each side jamb. If you have casing on both sides of the door, this will be difficult to check...you may have to rely on your carpenter's word on this one. Also check the height of the door. The door should be high enough to clear the thickness of the flooring you will be installing. In our case, I told the carpenter to set the door up 1" off the floor to clear the carpet and pad thickness.
-
Cleanouts/Access Panels. Make sure all of these panels were trimmed as per your scopes of work and specifications. I like to use screws (instead of nails) to secure these in place so they are easy to remove and replace.
By following a few simple quality checks, the trim carpentry in your basement finishing build out will really help improve the look of your new space.
When you first bid out your new basement finishing project, be sure to include in your carpet bid package the requirement to have seam diagrams. A seam diagram will show you where the company proposes the seams to be located in your new space. Ideally, you will want these to be located in the least conspicuous locations and out of high foot traffic areas.
Because standard carpet comes in 12' wide rolls, you typically will have at least one seam in your larger rooms. For our basement finishing project, our room is long and relatively narrow, at just under 12' in width. This left us with very little waste.
Quality Check, Basement Finishing:
Seams: make sure the carpet backing is tight at the seam. If the cut was straight and the seam made properly, there should be no gaps between the pieces. The tape at the seam has a thickness to it. Therefore, it makes the carpet fibers above it stand up a little higher. Most good installers will trim the carpet fibers at the seam so it blends in better with the rest of the floor.
Transitions: Make sure the transitions from one flooring to the next are of the appropriate type and finish. For our latest finish we used a chrome piece to more closely match the brushed chrome door hardware. Don't let the installer use the old brass piece that's been sitting on the truck for years on your new basement finishing project. You will also want to check to make sure these transitions are in the proper locations. You want them to be centered under the door slab at doorways so when the door is shut, the transition piece is hidden.
Pad: Check to make sure the correct pad style and thickness was used. You may have to check the scraps since you won't have access to the installed pad. Be sure to check, I have had the wrong pad installed on more than one occasion in my building projects.
Collateral Damage: We know we can expect some paint scuffs based on how carpet is installed. However, do a quick walk around to make sure there was no major damage done to your trim or walls.
Reinstalled Door Slabs: Carpet installers will remove doors in order to make the carpet install easier. Make sure they have been put back and check their operation. If doors were put back in the wrong opening, they may not function properly.
Your new basement finishing project will go smoothly if you follow the builder tips and secrets we shared with you here.